How to Implement Side Drawer Navigation for iOS
The slide-out design pattern lets developers add permanent navigation to their apps without taking up valuable screen real estate. The user can choose to reveal the navigation at any time, while still seeing their current context.
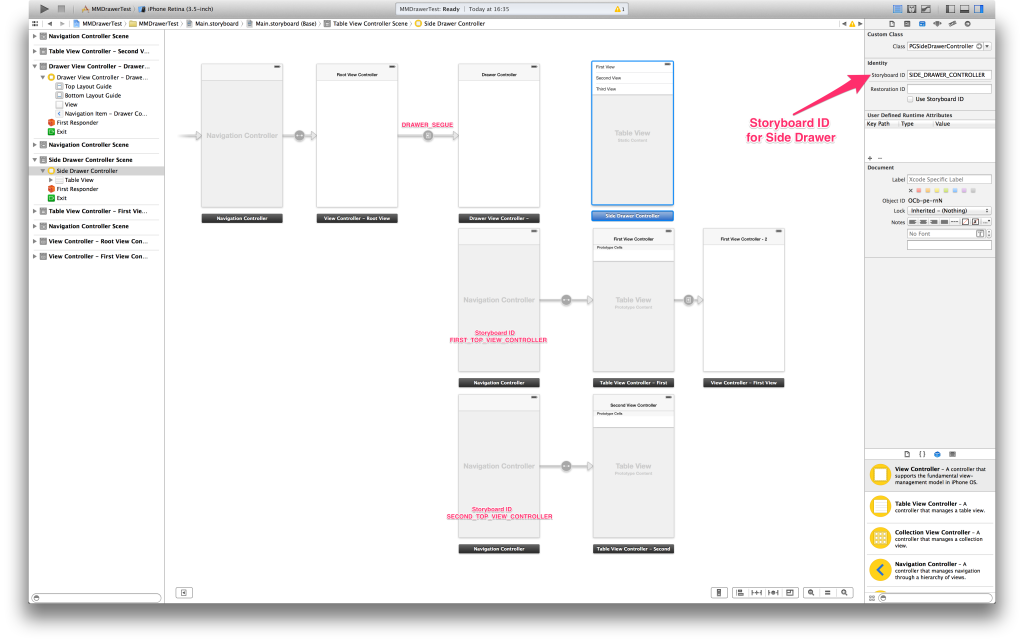
Its really easy to add one in your apps with wonderful libraries like MMDrawerController around. But most of the examples around just show an overly simplified view without any hints on how to structure your code for such a navigation pattern. This post tries to introduce an intuitive and easy to maintain structure for integrating MMDrawerController in an app with multiple contexts using Storyboard. Lets say, we want to have a root controller that does something and then we navigate to the drawer controller. The DrawerController is an instance of MMDrawerController and wraps a navigation drawer, and a center view controller. We will create everything in the Storyboard and use [self.storyboard instantiateViewControllerWithIdentifier:identifier] to instantiate the view controllers properly from there into our drawer controller’s leftDrawerViewController and centerViewController. Here’s how our Storyboard looks like:

Notice that we assign a storyboard identifier in the Identity Inspector so that we can instantiate the view controller from the Storyboard. Let’s assign identifier FIRST_TOP_VIEW_CONTROLLER to the navigation controller of FirstViewController so that we can use it as a center view controller. Now, all we need to do is to perform the segue to Drawer View Controller and instantiate the left and center controllers in the prepareForSegue: and set the controllers to the drawer controller like so:
-(void) prepareForSegue:(UIStoryboardSegue *)segue sender:(id)sender {
  if ([segue.identifier isEqualToString:@"DRAWER_SEGUE"]) {
    MMDrawerController *destinationViewController = (MMDrawerController *)segue.destinationViewController;

    // Instantitate and set the center view controller.
    UIViewController *centerViewController = [self.storyboard instantiateViewControllerWithIdentifier:@"FIRST_TOP_VIEW_CONTROLLER"];
    [destinationViewController setCenterViewController: centerViewController];

    // Instantiate and set the left drawer controller.
    UIViewController *leftDrawerViewController = [self.storyboard instantiateViewControllerWithIdentifier:@"SIDE_DRAWER_CONTROLLER"];
    [destinationViewController setLeftDrawerViewController: leftDrawerViewController];
  }
}
Now, we have a basic setup where we can segue to a navigation controller and instantiate the drawer and center controllers from the Storyboard. Now, how do we handle a user click on the the side drawer items to navigate to another controller in the center? Its simple! Just instantiate another view controller (like [self.storyboard instantiateViewControllerWithIdentifier:@"SECOND_TOP_VIEW_CONTROLLER"]) and set it as the center view controller for the drawer controller. You can access the drawer controller form any of your view controller using self.mm_drawerController.
[self.mm_drawerController setCenterViewController:[self.storyboard instantiateViewControllerWithIdentifier:@"SECOND_TOP_VIEW_CONTROLLER"] withCloseAnimation:YES completion:nil];Just add more outlets from the side navigation drawer, instantiate new center controllers and set to the drawer controller. Its that simple to add a fully functional navigation drawer in your app. Now, you can keep on adding more controllers to each of you individual section just like you would in a normal app by creating more segues.
Here’s an implementation using this approach.
If you need a developer for your project, feel free to contact me at pulkit110@gmail.com